| Materials | Tools | ||
|
|

DryPak® Pave Set is a blend of carefully selected sand and gelling agents suitable for filling gaps between concrete and clay paving blocks and bricks. Ideal for use in driveways, footpaths, patios and areas of high traffic. Helps inhibit weeds and insect infestation.
Please see below for our step-by-step guide for paving; alternatively you can download our printable copy here:
![]()
-
1
Setting Up
It is vital to prepare the area properly to achieve a professional result.
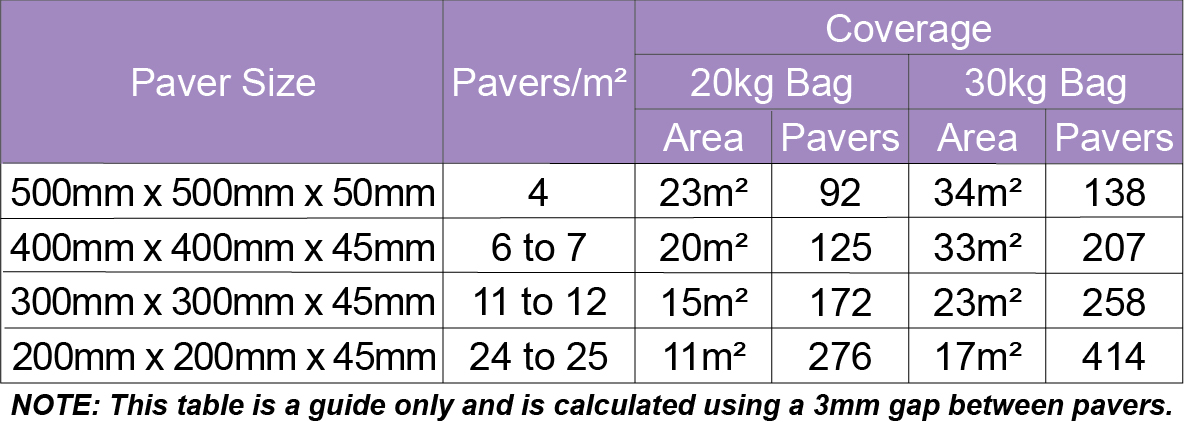
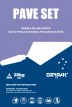
Dig out the area to be paved to the depth of your pavers plus 30 mm for the bedding sand.
If the underlying soil is not firm (or has a high clay content) you will need to dig a further 50 mm to allow for a base of coarse material such as quarry rubble.
Place string lines around the area to be paved, then slope them away from nearby structures to allow for water run-off (a drop of 20 mm for every metre of pavers is recommended).
If necessary lay the base of coarse material and compact to a depth of 50 mm using the rubber mallet and board (or plate compactor).
Spread the bedding sand over the area evenly with the rake to a depth of about 40 mm. DO NOT use beach sand or fine sand.
Place the wooden rails along the sides of the area and level the bedding sand with the screeding rail.
-
2
Placing the Pavers
After selecting the pattern of your pavers, lay them evenly, keeping them square with your starting edge.
Ensure that you always leave a minimum gap of 2mm between your pavers.
If you are laying your pavers against a structure, ensure that the top of the pavers are below the damp proof course and that there is a plastic membrane between the structure and the paved area.
Once your pavers have been placed, check that they are square and make any adjustments as needed.
-
3
Edging the Pavers
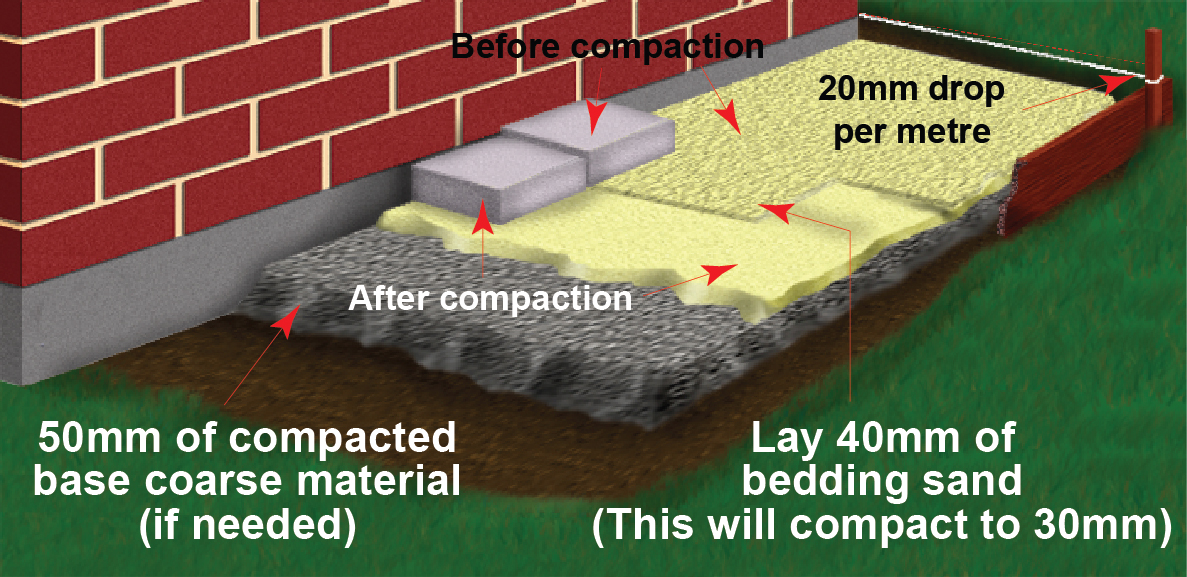
To ensure that your pavers do not move, you will need to construct an edging around your paved area.
Use timber edging or a concrete such as DryPak® General Purpose Concrete to create the edging.
When you install your edging, make sure that it is approximately 10mm below the level of the paved area to allow for the compaction of the bedding sand (see diagram below).
-
4
Applying the Pave Set
- DryPak® Pave Set SHOULD NOT be applied on damp or wet pavers or used around swimming pools or areas that will be constantly saturated as it DOES NOT prevent water from penetrating through the gaps to the substrate.
- DryPak® Pave Set SHOULD NOT be applied to the paved area if rain is forecast within 24 hours.
- Ensure pavers are dry by covering a small area with plastic for 24 hours. After 24 hours inspect the underside of the plastic for moisture. This is essential if pavers are freshly made or have been subject to recent rain.
- Once you are satisfied with the layout of your pavers, the edges are in place and the pavers are dry, pour the DryPak® Pave Set evenly over the paved area until the gaps between the pavers are filled. A good practise is to pour the DryPak® Pave Set along the joints to minimise the potential for segregation of the polymer from the sand.
- Using a rubber mallet and board (or plate compactor where appropriate) compact the pavers by approximately 10mm.
- Pour more DryPak® Pave Set into the joints as the compaction will have compressed the DryPak® Pave Set in the gaps.
- Compact the paved area again using the mallet and board (or plate compactor where appropriate).
- All excess DryPak® Pave Set must be removed from the area including the DryPak® Pave Set in the bevelled wedge. (Excess DryPak Pave Set left on the surface of the pavers may stain when sprayed with water). Using a blower ensure that all residue is removed from the top of the pavers.
- Using clean water, gradually wet the area with a fine spray so that the water consolidates the DryPak® Pave Set. Do not flood the area or use high pressure water that may wash the DryPak® Pave Set from the gaps.
- After 10 minutes soak the area again with water thoroughly without using high pressure.
- After a further 10 minutes thoroughly soak the area again with water to allow the water to penetrate to the full depth of the pavers.
- After soaking, allow the DryPak® Pave Set time to dry out. This drying process is essential to allow the DryPak® Pave Set to gel sufficiently. DryPak® Pave Set will NOT go hard. It will gel to a firm surface when dry.
- During periods of wet weather or high humidity, the DryPak® Pave Set could take several days to gel.
- The paved area should be ready for use after 24 hours. This time may vary depending of the weather conditions and the depth of the pavers.
- You may need to top up the gaps every year, especially after heavy rains. To do this clean out the gap before applying the DryPak® Pave Set into the gaps and soak as described in steps 9, 10 & 11 above.